Azure Automation and Function Apps offer server-less script execution.
This post explains key differences between Azure Automation and Function Apps, concludes with an opinion on the preferred choice for a Scheduled Task replacement.
Comparing site by site
Usage / Use cases
Both allow the execution of scheduled jobs which themselves are based on scripts. PowerShell is supported on both options.
Azure Automation is triggered either by time or via web-hook. The “result” is like when working with Scheduled tasks. From file-operations to changes in the Azure infrastructure or any other job which is deterministic.
Function Apps also allow time trigger, but also offer a eventgrid integration and some native events, like for instance “on new file in storage account”. Also they can expose web endpoint. That means you could pass in parameters via HTTP Post or in the Query string and get result as JSON for example. There is also the concept of “durable functions” which more or less means that there are always ready to deliver results.
Audience
Azure Automation are targeting IT-Pros, formerly known as System Administrators.
Function Apps on the other hand are more developer focused. SREs or DevOps are also included here.
Manageability
Azure Automation uses “Accounts” as container objects for RunBooks. Settings that apply to all RunBooks such as Environment-Variables, Secrets or shared PowerShell modules.
Activating “Managed Identity” allows granting permissions on other Azure services like for instance allowing starting and stopping of VMs.
A RunBook itself is as dedicated Azure object that contains the script which may bound to a schedule and the execution choice.
Function Apps require an App Server Plan as foundation. The plan defines supported frameworks and dictates the costs. On the other hand, it allows vertical and horizontal scaling!
Dependencies and other settings are defined in *.json files and require little research.
Typically, only one script is stored on a Function App. Multiple scripts are possible but require attention when maintaining them in the different folder structures.
Complexity Level
Azure Automation in general is “simpler” in setting up and maintaining. Mostly because multiple jobs can be managed from one console. Another important aspect is that many aspects configurable via graphical user interface.
Once figured out how they work, using them is convenient.
Function Apps require more considerations when setting up and while maintaining. Most aspects must be done via configuration files. Setting up a schedule for instance requires knowledge of Cron syntax. In my experience PowerShell module dependencies are regular problematic. It is advisable to only import those which are essential for the script to work.
Mastering them have a steeper learning curve.
Various Differences
Azure Automation know the concept of “Hybrid Worker”. Behind that term are ARC enabled Windows Servers which allow the execution of scripts on them. This allows access to resources within the datacenter / the active directory / the private cloud with benefiting for all advantages that Azure technologies brings.
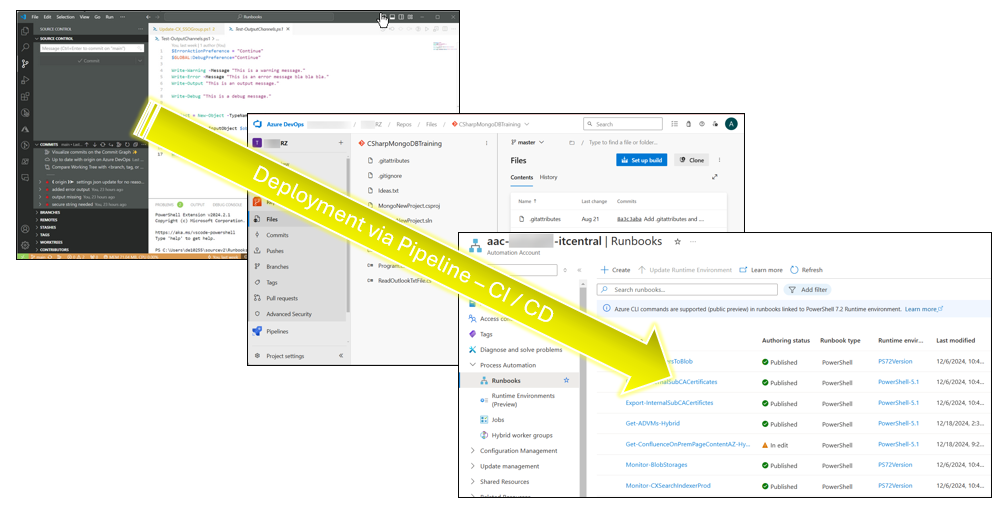
GIT integration with bidirectional sync. – Deployment pipeline managed automatically.
Function Apps offer a rich set of integrations with Azure PaaS services. As they run within the context of an App Service Plan there are horizontal and vertical scaling options available to overcome also very demanding jobs.
Supported languages: PowerShell, C#, NodeJS, Python and more.
GIT integration with bidirectional sync and support for complex pipelines within Azure DevOps allow also sophisticated scenarios.
Conclusion
In my opinion is Azure Automation the best fit to be the better alternative to tradition Scheduled Task. Version Control, Change-Tracking, Security, Monitoring, Redundancy options and much more are reason for it.
Scheduled Tasks have been around since the early days of Windows Server. The task scheduler is the inbuilt component used to plan and execute jobs. Typically, System administrators use them to automate reoccurring activities which are defined in scripts.
While Scheduled Tasks are robust and easy to use, they have a couple of shortcomings.
This blog explains the advantages of Azure Automation or Function App over Scheduled tasks.
Looking on Scheduled Tasks and their opponents in Azure
Storage / Location
Scheduled Tasks are stored on an individual computer. – If the computer requires replacement or decommissioning, the task needs to be migrated.
Azure Services live in the cloud and have no fixed relation to a computer.
Execution
Scheduled Tasks are executed on an individual computer. – In case the computer is unavailable, the task will not run.
Azure Services run typically in the cloud OR on designated computers.
Redundancy
Scheduled Tasks have no redundancy options out of the box. – They are typically stored only on 1 computer.
Azure Services provide different options for been redundant. Even if execution is on computers.
Change Tracking / Versioning
Scheduled Tasks are changed on demand without direct support of managing the change properly.
Azure Services can be connected to a Version Control System, e.g. Azure DevOps and allow tracking on changes and versioning via underlying GIT protocol.
Monitoring
Scheduled Tasks can be monitored on a the individual computer. For centralized monitoring the use of SCOM or an alternative Server-Monitoring system is required.
Azure Services can send diagnostic and performance data via single click to a central Log Analytics Workspace. Kusto queries allow monitoring and alerting.
Security
Scheduled Task run typically under the context of “System” which has the highest level of permissions on the individual server. By using the computer object, permissions on remote locations, like file-shares or others can be granted.
In cases a dedicated User account is created, has to be granted sufficient permissions on the computer to run the task. Typically the password is stored and never changed.
In worst cases, the credentials are stored in plain text within the script.
Azure Services can leverage a “managed identity” which password is neither exposed nor it requires attention. Furthermore, if credentials for different operations within the script are needed, the managed identity can be granted access to a Key Vault to obtain secret information securely.
Costs
Scheduled Tasks are part of the Windows operating system and do not come with extra costs or licenses.
Azure Services offer free tiers or are charged for minimal wages.
Round Up
To conclude, Azure Runbooks and Function Apps outperform the traditional Scheduled Tasks in many aspects.
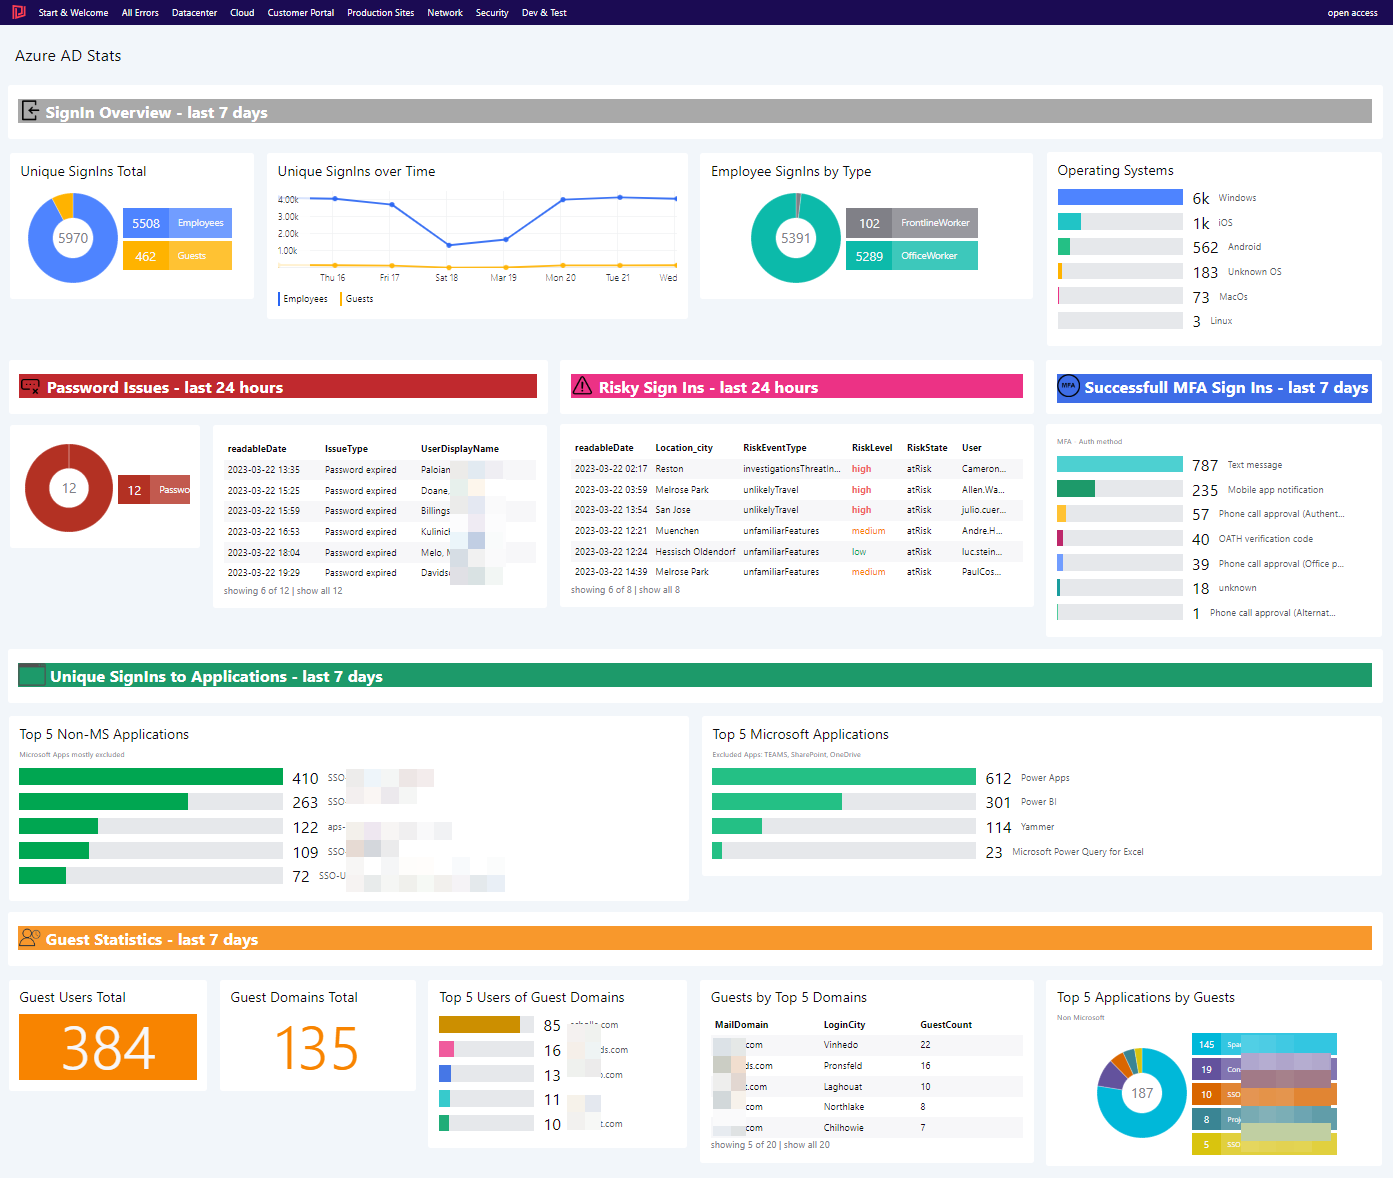
When Azure AD is configured to record Sign-In activity, #Kusto can be used to gain valuable insights. This blog walks through common needs and shows how to visualize them in #SquaredUp.
Introduction
Having Azure AD as identity provider offers convenient Single Sign On experience for users and increased security due to MFA and other identity protection features.
Enabling auditing and storing the results in a Log Analytics Workplace allows detailed analysis about application usage, sign-in experience, user behavior and overseeing guest activity in your tenant.
Shortly after enabling of logging, events are logged in the SigninLogs table. – Nearly all queries in this blog are against this table.
Links about learning KQL can be found in the appendix. – Particular questions about code will be answered. – Also suggestions for better queries are appreciated! 😉
Configuration & Code
In the remaining, most of the visualizations will be explained in detail. Queries are written in #KQL and which finalizes this article.
Unique SignIns Total
This donut diagram shows the proportion of between Guests and Members ( here called Employees ) with concrete numbers. Each Guest or Member login is only count once.
SigninLogs
| where TimeGenerated between (startofday(ago (7d)) .. now())
| where ResultType == 0
| where UserPrincipalName matches regex @"\w+@\w+\.\w+"
| extend UserLoginType = iif(UserType == "Member","Employees","Guests")
| project UserLoginType, UserPrincipalName
| summarize dcount(UserPrincipalName) by UserLoginType
Azure -Log Analytics (Donut) is the best fit here.
Unique Sign Ins over Time
This diagram shows Guests and Members ( here Employees ) sign in count, summarized by day. Each day counts individually.
SigninLogs
| where TimeGenerated between (startofday(ago (7d)) .. now())
| where ResultType == 0
| where UserPrincipalName matches regex @"\w+@\w+\.\w+"
| extend UserLoginType = iif(UserType == "Member","Employee","Guest")
| project TimeGenerated, UserLoginType,UserPrincipalName
| summarize Employees = dcountif(UserPrincipalName,UserLoginType=="Employee"), Guests = dcountif(UserPrincipalName,UserLoginType=="Guest") by bin(TimeGenerated, 1d)
Azure – Log Analytics (Line Graph) is the choice here.
Operating Systems
Used operating systems are mostly correct identified and show clearly from where Azure AD applications are consumed.
Azure – Log Analytics (Bar Graph) is picked for this visualization.
Password Issues
Users failing to login due to password issues or other are shown here. Only the last day is considered in the queries.
For the donut, use the following KQL query:
SigninLogs
| where TimeGenerated between (ago(1d) .. now())
| where ResultType in(50144,50133,50126,50053)
| where UserPrincipalName matches regex @"\w+@\w+\.\w+"
| summarize arg_max(TimeGenerated, *) by UserPrincipalName
| extend IssueType = case (ResultType == 50126 , "Invalid username or bad password"
, ResultType == 50133, "Session invalid due to recent password change"
, ResultType == 50144, "Password expired"
, ResultType == 50133, "Account locked"
, "Unknown"
)
| where IssueType !in("Unknown","Session invalid due to recent password change","Invalid username or bad password")
| extend readableDate = format_datetime(TimeGenerated,"yyyy-MM-dd HH:mm")
| summarize Users = dcount(UserPrincipalName) by IssueType
The table overview is realized with the lines below
SigninLogs
| where TimeGenerated between (ago(1d) .. now())
| where ResultType in(50144,50133,50126,50053)
| where UserPrincipalName matches regex @"\w+@\w+\.\w+"
| summarize arg_max(TimeGenerated, *) by UserPrincipalName
| extend IssueType = case (ResultType == 50126 , "Invalid username or bad password"
, ResultType == 50133, "Session invalid due to recent password change"
, ResultType == 50144, "Password expired"
, ResultType == 50133, "Account locked"
, "Unknown"
)
| where IssueType !in("Unknown","Session invalid due to recent password change","Invalid username or bad password")
| extend readableDate = format_datetime(TimeGenerated,"yyyy-MM-dd HH:mm")
| extend Day = format_datetime(TimeGenerated,"yyyy-MM-dd")
| extend Time = format_datetime(TimeGenerated,"HH:mm")
| summarize by IssueType, readableDate, UserDisplayName,UserID=onPremisesSamAccountName, Day, Time
Risky Sign-ins
One of Azure ADs most famous protection features is Risky Sign-Ins. An algorithm here checks for possible malicious sign in attempts that occur when credential theft occurred.
AADUserRiskEvents is the table which stores this information.
AADUserRiskEvents
| where TimeGenerated between (ago(1d) .. now())
| where RiskState != "dismissed"
| where RiskState != "remediated"
| extend readableDate = format_datetime(TimeGenerated,"yyyy-MM-dd HH:mm")
| extend Day = format_datetime(TimeGenerated,"yyyy-MM-dd")
| extend Time = format_datetime(TimeGenerated,"HH:mm")
| summarize arg_max(TimeGenerated, *) by UserPrincipalName
| project User = replace_string(UserPrincipalName,"@mydomain.com",""), readableDate, RiskLevel, RiskEventType, RiskState, tostring(Location.city), Day, Time
Azure – Log Analytics ( grid ) is used for the table. Conditional formatting help to spot most serious events.
MFA Successful Sign Ins
Details about usage and preference of MFA can be obtained from the Sign-In logs.
SigninLogs
| where TimeGenerated between (startofday(ago(7d)) .. now())
| where ResultType == 0 and ConditionalAccessStatus == 'success' and Status.additionalDetails == "MFA completed in Azure AD" and ConditionalAccessPolicies[0].result == "success" and parse_json(tostring(ConditionalAccessPolicies[0].enforcedGrantControls))[0] == "Mfa"
| where UserType == "Member"
| project Identity, MFAType = iif(isempty(tostring(MfaDetail.authMethod)),"unknown",tostring(MfaDetail.authMethod))
| summarize TotalUsers = dcount(Identity) by MFAType
| sort by TotalUsers desc
Top 5 Non-MS Applications
Usage trends of applications can be retrieved. Microsoft recently released a website which enumerates many of its applications. – Unfortunately, not all and as a static website.
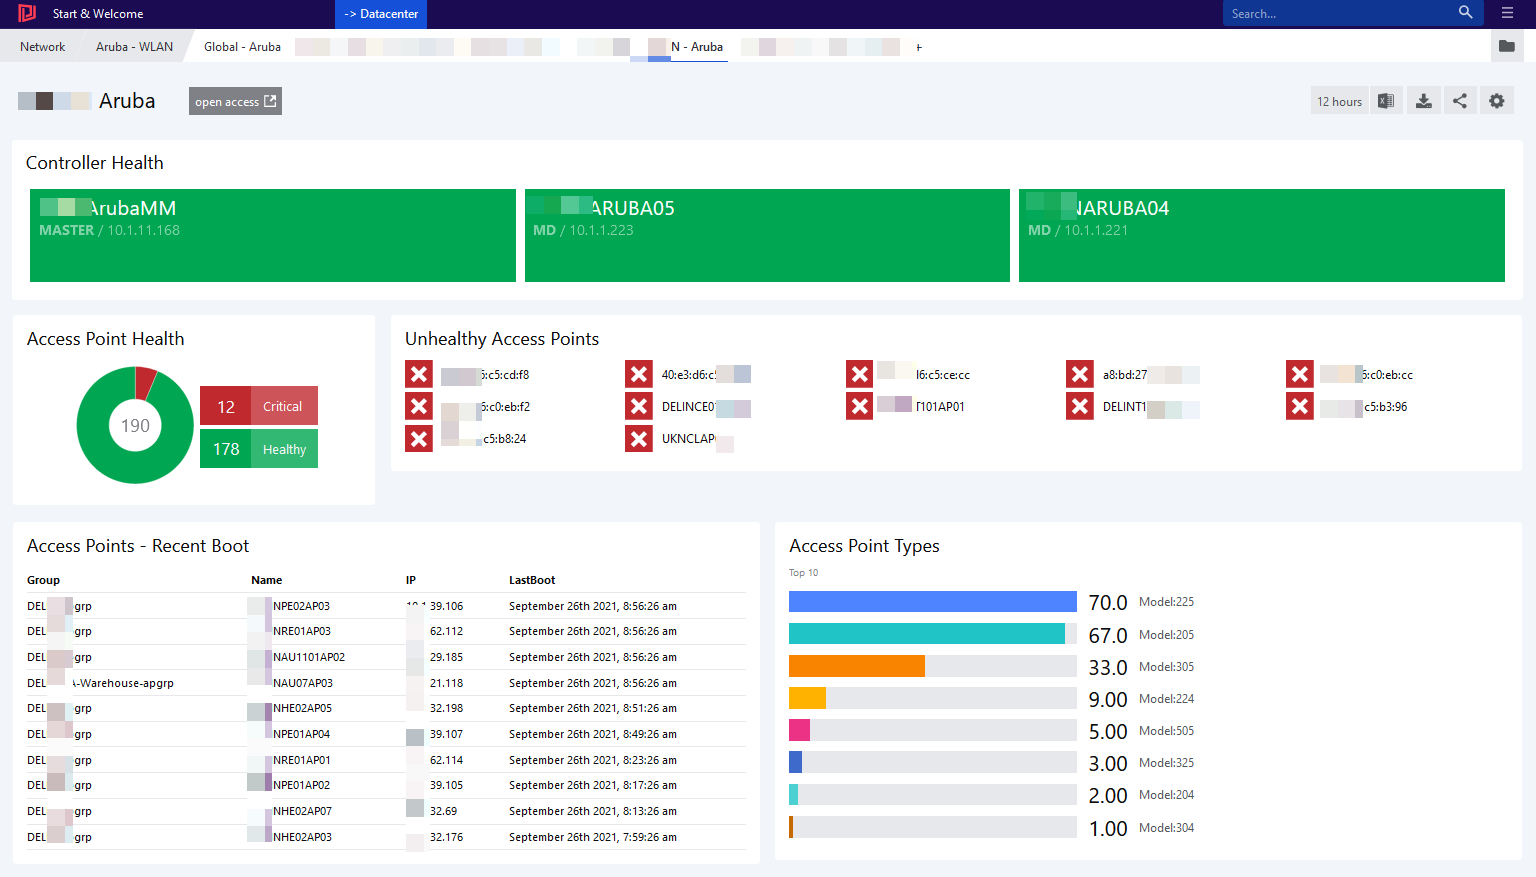
Aruba Wireless technology is one of the market leaders. Squared Up can bring in visibility and reduces the MTTR*.
This post explains by example how to extract, transform, and visualize Aruba data by using the PowerShell and Squared Up.
Introduction
Aruba (part of HP Enterprise) provides wireless LAN solutions for small offices to large enterprise networks. Mobility-controller are used to manage access points centrally. By using master-controller a management hierarchy can be setup by keeping one point of administration.
Network specialists either use command line or the web interface. Automation and programmatic access are given via common REST API.
Squared Up in version 5.3 (Jan 2022) offers many possibilities to retrieve data and visualize it in no time.
Most versatile capability is the native integration of PowerShell. It allows any kind of data transformation or aggregation before passing it the dashboard engine.
Prerequisites
At least Aruba OS 8.5 on the controller and PowerShell 5.1 on the Squared Up server are suggested.
A local user account “aruba_monitor” with password needs to be created on the controller.
Dry Run
Before coming to the details, try if retrieving Aruba information from the Squared Up server works.
Getting all switches:
The script below retrieves all switches ( controller ) and adds state information that is needed for Squared Up. The information is stored in a CSV file which allows instant showing of the information. Use Scheduled Tasks to run the script regularly (e.g. every 5 minutes).
#region PREWORK Disabling the certificate validations
add-type -TypeDefinition @"
using System.Net;
using System.Security.Cryptography.X509Certificates;
public class TrustAllCertsPolicy : ICertificatePolicy {
public bool CheckValidationResult(
ServicePoint srvPoint, X509Certificate certificate,
WebRequest request, int certificateProblem) {
return true;
}
}
"@
[Net.ServicePointManager]::CertificatePolicy = New-Object -TypeName TrustAllCertsPolicy
#endregion PREWORK
$API_BASE_URI = 'https://your-aruba-master-url'
$DeviceUsername = 'aruba_monitor'
$DevicePassword = 'your-password'
$session = Invoke-RestMethod -Uri "${API_BASE_URI}/v1/api/login" -Method Post -Body "username=$DeviceUsername&password=$DevicePassword" -SessionVariable api_session
$sessionID = $session._global_result.UIDARUBA
$allSwitches = Invoke-RestMethod -Uri "${API_BASE_URI}/v1/configuration/showcommand?command=show+switches+all&UIDARUBA=${sessionID}" -WebSession $api_session
$switches = $allSwitches.'All Switches'
$switchList = New-Object -TypeName System.Collections.ArrayList
foreach ($sw in $switches) {
$stateTmp = ($sw.Status -split ' ')[0]
$state = 'Healthy'
if ($stateTmp -ieq 'up') {
$state = 'Healthy'
} elseif ($stateTmp -ieq 'down') {
$state = 'Critical'
} else {
$state = 'Warning'
}
$swObj = [pscustomobject]@{
ConfigID = $sw.'Config ID'
ConfigSyncTimeSec = $sw.'Config Sync Time (sec)'
ConfigurationState = $sw.'Configuration State'
name = $sw.Name
IP = $sw.'IP Address'
Status = $stateTmp
Location = $sw.Location
Model = $sw.Model
SiteCode = $sw.Name.Substring(0,5).ToUpper()
Type = $sw.Type
State = $state
}
$null = $switchList.Add($swObj)
} #end foreach ($sw in $switches)
$switchList | Export-Csv -NoTypeInformation -Path C:\temp\aruba_switchlist.csv -Force
#log off – Important as otherwise all sessions will be blocked!
Invoke-RestMethod -Uri "${API_BASE_URI}/v1/api/logout" -Method Post -SessionVariable api_session
Getting all access points:
For convenience, simply extend the script above ( just before log off section ) the following lines which export all access points. – Some meta information is appended, too:
Another great use case is using the PowerShell (Status Icon) tile in combination with your building layout. – See your access points health and know exactly where they are:
Combining SCOM, NiCE’ Active 365 MP and SquaredUp helps to bring light into your M365 tenant.
O365 Cockpit – SCOM+NiCE+Squared Up
The remaining section shines in the light of Governance. It provides a few dashboard ideas and explains used components in detail.
M365 – Service Status
Consolidates various aspects about service health, incidents and consumption.
(1) The top section shows health state about all services used in your tenant including the last update time. (2) In the middle information about current incidents are shown.
Combines SharePoint Online availability and performance aspects measured from different proxy locations with details about recent most frequently visited and highest storage consumption.
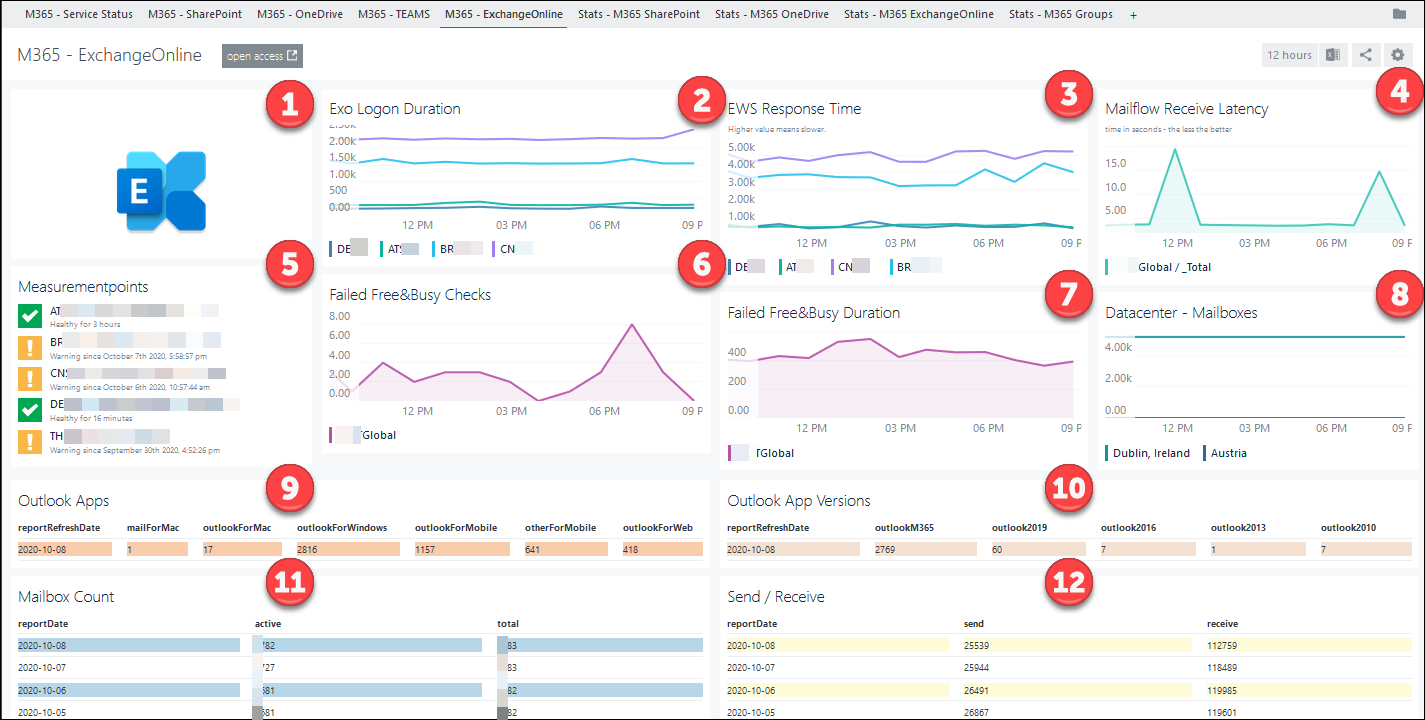
Combines Exchange Online availability and performance aspects measured from different proxy locations with details about connecting Outlook Apps and Version with recent Mailbox Count- and Send / Receive statistics
Squared Up is a rich dashboard solution for System Center Operations Manager.
From health state information, over performance data, alerts, SLA-reporting and agent – tasks all can be consumed.
The Visualization Layer
By providing great visualizations, interactive drill downs and many interfaces it helps to engage application owners, help desk, sysadmins, developers and even business aka end-users.
Direct integrations for REST-APIs, MS-SQL, Visio Layouts, Graphics, Websites, Azure – AppInsights, Azure – Log Analytics, Service Now and native HTML 5 support converts it to a central monitoring cockpit – “one pane of glass”.
Building dashboards is a very intuitive either via Drag & Drop or for advanced users by editing JSON within the browser directly.
Beside the excellent support for customers, and a forum offers a place for asking questions around SCOM, Azure Monitor and Squared Up itself of cause.
Squared Up & NiCE
Below, a few screenshots taken from customers’ environment. It uses NiCE’ starter dashboards.
Squared Up – More examples
To have a better idea what else can be done with proper dashboards a few more examples:
Good to know
Note: By the time of writing, the Squared Up for SCOM is version 4.8.1 which was released in October 2020.
As always with SCOM, the right Management Pack is required 😉
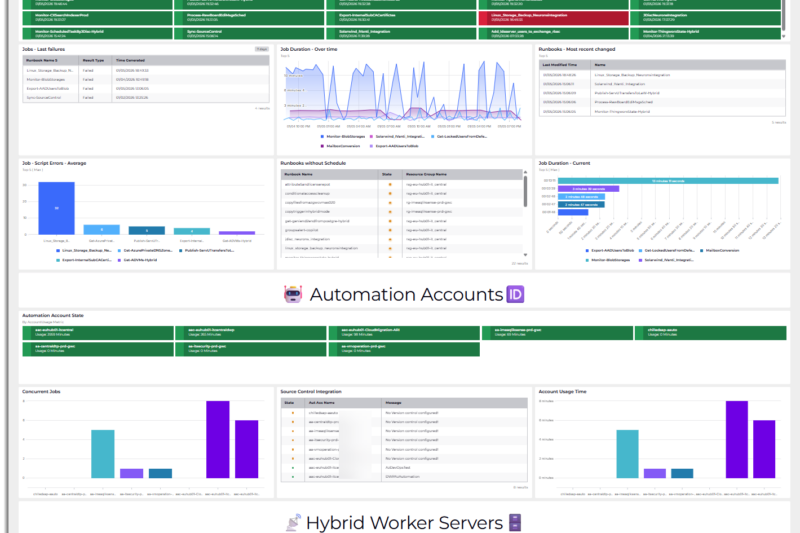
Active 365 MP by NiCE can track and monitor various aspects of the M365 suite.
The Management Pack
Core is a small executable runs on an OpsMgr Management Server or a OpsMgr – Gateway and performs the tests and synthetic transactions. Only a few configuration steps are required 🙂
Active 365 MP Architecture
Two different monitoring modes are available. If all Mailboxes have been already migrated, Online only Mode is the correct option. – Both support proxies. The architecture looks as below:
If Mailbox migration is still ongoing – or if some Exchange resources need to be kept on-premises, the hybrid mode fits.
Discovery
To make SCOM aware of your M365 tenant, some preparation steps are required.
User accounts with permissions on a SharePoint site, OneDrive and a Mailbox are needed. Additional permissions are configured within Azure Active Directory / Enterprise Applications.
Information about the user accounts need to be stored in configuration files.
Monitors
After details about the M365 tenant have been discovered, corresponding objects are created and appear in the diagram vies. Monitors can be enabled to perform many different tests to ensure and measure service availability.
M365 / Exchange (ExO pure or Hybrid) – EWS Response Availability / Time (msec) – Autodiscover Retrieval Availability – Mailbox Logon Availability / Duration – Free / Busy Check – Mailbox Send & Receive Availability – Mailbox Receive Latency – Autodiscover Retrieval Duration – Service Health Status
M365 / SharePoint Online – SpO Logon Latency – SpO File Up- and Download Check – SpO Log On Latency – SpO Health Score – Request Duration – IIS Request Latency – SpO Site Availability – SpO Storage Usage (GB) Summary – SpO Service Health Status
M365 / OneDrive – OneDrive Log On Latency – OneDrive File Up- and Download Check – OneDrive Availability – OneDrive Service Health Status
M365 / Teams – Monitor Teams Chat – Test LightTeam Chat Availability – Team Service Health Status
M365 Monitors – All Services Health Rollups
M365 – Exchange – Health State and Rollup
Monitors allow customization of thresholds as the default do not suit every environment. If needed, alerting can be enabled to notify about a decreasing performance or loss of service.
Performance Rules
Most transactions that are realized as a Monitor also store the retrieved value and allow reporting via graph plotting and understand trends.
E.g. Rules track Receive Latency, File Up- and Download Time and Request Duration
On Tenant Level: – Active M365 License Units – Consumed M365 License Units – Warning M365 License Units – Active Users – Available M365 Licenses – Identity Service Health, MDM Service Health, M365 Portal Health, M365 Client Application Health, Subscription Health, Number of ExO Mailboxes and others
On Services Level: M365 – Teams Chat – Performance from 3 Proxy locations
M365 – Exchange Online – Number of Failed Free Busy checks
To simulate the speed and connectivity from different points in the organization, proxy locations can be configured. As the name states, it is based on web-proxy services that need to be stored in a configuration file.
Based on this information then, tests and probes are sent via the web-proxies, too.
Good to know
Note: By the time of writing, the Active 365 MP is version 3.1. At October 2020 NiCE released already version 3.2!
Microsoft 365 is a managed service which offers Exchange, SharePoint, Teams, OneDrive and many more services worldwide. With it, responsibilities of IT staff evolved and changed.
Monitoring however is still a crucial aspect. In this short article, I will explain why SCOM a perfect solution for this is.
Monitoring – What and Why?
With M365, IT staff do not need to take care anymore of VMs, Windows patching, configuring the global mail-routing or managing the SharePoint farm. Microsoft is doing it all, so why bother with monitoring?
Although all runs in the cloud, these are still usual applications. They have bugs, they fail from time to time, respond slowly and perhaps behave weird. – All like before 😉
You might have found you already in the situation that a user called and complained about poor SharePoint performance. Another user called and mentioned that the whole Australian team cannot make Teams calls. Perhaps the secretary of the CEO called nervously mentioning she can’t book appointments because Free & Busy is not working well.
Microsoft plays an open deck here and shares news about outages with world. – There is a twitter account which tells things like:
Microsoft 365 Status @MSFT365Status | 2020-07-14 We’re investigating an issue affecting access to SharePoint Online and OneDrive for Business that is primarily impacting customers in EMEA. Additional details can be found in the admin center under SP218450 and OD218456.
In the M365 Admin portal we have a section about “Service Health”. In it we can find messages like:
A very limited number of users may intermittently be unable to access Exchange Online via any connection method
… but is that affecting us in this moment?
So, we can only look sad and tell our users’ that we’re opening a ticket? Luckily, we can do more 🙂
Requirements
Your environment needs to be at least running SCOM 2012 R2. Either a Management Server or a SCOM- Gateway needs to be able to reach Microsoft via Internet. – Proxies are supported, too.
The hard monitoring work is done by NiCE Active 365 MP. The beautiful visualizations are leverage Squared Up for SCOM. – Last piece is the free Data On Demand Management Pack ( always up to date via MP Catalog ) which is used to retrieve M365 meta information to provide more context.
Good to know
Using Squared Up’s Open Access dashboards can be consumed by every user. No licenses are required. 🙂
SAP Process Orchestration (or Integration) is a software within SAP which functions as data transformation gateway. It’s a central component of an SAP infrastructure and the standard way to communicate with external parties.
This post will show how to apply Squared Up’s “Single Pane of Glass” approach to SAP PI/PO.
Introduction
SAP PI/PO offers a SOAP interface that can be used to gather information about the system. In our case we are interested about the ‘health state’ of the individual communication channels.
As SOAP expects a XML payload and responds then in XML a ‘transformation’ is required as Squared Up only works with RESTful APIs.
To have a solution that can be applied to different cases a free & opensource Management Pack for SCOM has been created. It serves well for this particular task and can be extend if needed.
Groundwork
SAP PI/PO
The configuration for SAP PO is rather simple. A normal user account needs to be created ( e.g.: in Active Directory ). In this example the user is called E11000.
In SAP PO – Identity Management then assign the roles of SAP_JAVA_NWADMIN_LOGVIEWER_ONLY and SAP_XI_APPL_SERV_USER
That’s all.
PowerShell – Test
Use the following code to test if all working as expected.
The result of Out-GridView shall look similar to this one:
SCOM
SCOM is here only used to run an Agent Task which queries the SOAP services and transforms the data to JSON. The task consists of the Powershell script (mostly like above) which is then showing the results in Squared Up.
If you have questions or comments, feel free to contact me. You find me on twitter or on LinkedIn.
If the code isn’t running on your machine 😉 Or you like to add more features, please navigate the the corresponding GitHub site and raise an issue. https://github.com/Juanito99/Windows.Computer.DataOnDemand.Addendum/issues
Squared Up’s Web-API tile allows it to integrate information
from any web-service that returns JSON data.
With Polaris, a free and open source framework it is
possible to build web-services just in PowerShell.
This example explains the steps to create web-service in Polaris which returns locked out user information and how to integrate them nicely in Squared Up.
Requirement
A windows server that will host your Polaris web-service
On that server PowerShell version 5.1
Active Directory Users & Computer and its module installed ( part of the RSAT )
Administrative permissions on to install Polaris (Install-Module -Name Polaris)
Create an empty directory adsvc insight of C:\Program Files\WindowsPowerShell\Modules\Polaris
Open the Windows firewall to allow incoming connection to the port you specify, here 8082.
Limit this port to only accept request from your Squared Up server.
NSSM – the Non-Sucking Service Manage to run your web-service script as a service. https://nssm.cc/
Realization
The solution consists of two PowerShell scripts. The first
one exports locked user information into a JSON file. It needs to be scheduled via
Task Scheduler to provide up-to-date information for the dashboard. It would be
also possible to extract locked user information on each dashboard load, but
that would be very slow.
Export Script
Create a directory C:\ScheduledTasks and copy the following lines into text file. Name it Export-ADLockedAndExpiredUsers.ps1. Place the following content into it:
Import-module ActiveDirectory
$jsonFilePath = 'C:\ScheduledTasks\SquaredUpExports\ADLockedAndExpiredUsers.json'
# storing raw active directory information in ArrayList
$rawLockedUersList = New-Object -TypeName System.Collections.ArrayList
Search-ADAccount -LockedOut | Select-Object -Property Name,SamAccountName,Enabled,PasswordNeverExpires,LockedOut,`
LastLogonDate,PasswordExpired,DistinguishedName | ForEach-Object {
if ($_.Enabled) {
$null = $rawLockedUersList.Add($_)
}
}
# helper function to get account lock out time
Function Get-ADUserLockedOutTime {
param(
[Parameter(Mandatory=$true)]
[string]$userID
)
$time = Get-ADUser -Identity $_.SamAccountName -Properties AccountLockoutTime `
| Select-Object @{Name = 'AccountLockoutTime'; Expression = {$_.AccountLockoutTime | Get-Date -Format "yyyy-MM-dd HH:mm"}}
$rtnValue = $time | Select-Object -ExpandProperty AccountLockoutTime
$rtnValue
} #End Function Get-ADUserLockedOutTime
# main function that sorts and formats the output to fit better in the dashboard
Function Get-ADUsersRecentLocked {
param(
[Parameter(Mandatory=$true)]
[System.Collections.ArrayList]$userList
)
$tmpList = New-Object -TypeName System.Collections.ArrayList
$tmpList = $userList | Sort-Object -Property LastLogonDate -Descending
$tmpList = $tmpList | Select-Object -Property Name,`
@{Name = 'UserId' ; Expression = { $_.SamAccountName }}, `
@{Name = 'OrgaUnit' ; Expression = { ($_.DistinguishedName -replace('(?i),DC=\w{1,}|CN=|\\','')) -replace(',OU=',' / ')} }, `
Enabled,PasswordExpired,PasswordNeverExpires, `
@{Name = 'LastLogonDate'; Expression = { $_.LastLogonDate | Get-Date -Format "yyyy-MM-dd HH:mm" }}, `
@{Name = 'AccountLockoutTime'; Expression = { (Get-ADUserLockedOutTime -userID $_.SamAccountName) }}
$tmpList = $tmpList | Sort-Object -Property AccountLockoutTime -Descending
# adding a flag character for improved visualization (alternating)
$rtnList = New-Object -TypeName System.Collections.ArrayList
$itmNumber = $tmpList.Count
for ($counter = 0; $counter -lt $itmNumber; $counter ++) {
$flack = ''
if ($counter % 2) {
$flack = ''
} else {
$flack = '--'
}
$userProps = @{
UserId = $($flack + $tmpList[$counter].UserId)
OrgaUnit = $($flack + $tmpList[$counter].OrgaUnit)
Enabled = $($flack + $tmpList[$counter].Enabled)
PasswordExpired = $($flack + $tmpList[$counter].PasswordExpired)
PasswordNeverExpires = $($flack + $tmpList[$counter].PasswordNeverExpires)
LastLogonDate = $($flack + $tmpList[$counter].LastLogonDate)
AccountLockoutTime = $($flack + $tmpList[$counter].AccountLockoutTime)
}
$userObject = New-Object -TypeName psobject -Property $userProps
$null = $rtnList.Add($userObject)
Write-Host $userObject
} #end for ()
$rtnList
} #End Function Get-ADUsersRecentLocked
if (Test-Path -Path $jsonFilePath) {
Remove-Item -Path $jsonFilePath -Force
}
# exporting result to a JSON file and storing it on $jsonFilePath
Get-ADUsersRecentLocked -userList $rawLockedUersList | ConvertTo-Json | Out-File $jsonFilePath -Encoding utf8
Publish Script
Create a directory C:\WebSrv
and create an empty text file in it. Rename the file Publish-ADData.ps1. Place the following content into it. This
directory contains your web-service.
Import-Module -Name Polaris
$polarisPath = 'C:\Program Files\WindowsPowerShell\Modules\Polaris'
# runs every time the code runs and ensure valid JSON output
$middleWare = @"
`$PolarisPath = '$polarisPath\adsvc'
if (-not (Test-path `$PolarisPath)) {
[void](New-Item `$PolarisPath -ItemType Directory)
}
if (`$Request.BodyString -ne `$null) {
`$Request.Body = `$Request.BodyString | ConvertFrom-Json
}
`$Request | Add-Member -Name PolarisPath -Value `$PolarisPath -MemberType Noteproperty
"@
New-PolarisRouteMiddleware -Name JsonBodyParser -ScriptBlock ([scriptblock]::Create($middleWare)) -Force
# the Get route is launched every time the web-service is called
New-PolarisGetRoute -Path "/adsvc" -ScriptBlock {
$rawLockedUersList = New-Object -TypeName System.Collections.ArrayList
$rawData = Get-Content -Path 'C:\ScheduledTasks\SquaredUpExports\ADLockedAndExpiredUsers.json'
$jsonData = $rawData | ConvertFrom-Json
if ($jsonData.Count -ne 0) {
$jsonData | ForEach-Object {
$null = $rawLockedUersList.Add($_)
}
}
$reportTime = Get-item -Path C:\ScheduledTasks\SquaredUpExports\ADLockedAndExpiredUsers.json `
| Select-Object -ExpandProperty LastWriteTime | Get-Date -Format "yyyy-MM-dd HH:mm"
$maxNoOfUsers = $null
$maxNoOfUsers = $request.Query['maxNoOfUsers']
$getReportTime = 'no'
$getReportTime = $request.Query['getReportTime']
$getLockedUserCount = 'no'
$getLockedUserCount = $request.Query['getLockedUserCount']
#if getLockedUserCoutn is yes then return number of locked users
if ($getLockedUserCount -eq 'yes') {
$noProps = @{ 'number' = $rawLockedUersList.Count }
$noObj = New-Object psobject -Property $noProps
$response.Send(($noObj | ConvertTo-Json))
}
#if maxNumber is a number than return locked user information
if ($maxNoOfUsers -match '\d') {
$rawLockedUersList = $rawLockedUersList | Select-Object -First $maxNoOfUsers
$response.Send(($rawLockedUersList | ConvertTo-Json))
}
#if getReportTime is yes then the time of export will be returned
if ($getReportTime -eq 'yes') {
$tmProps = @{
'Time' = $reportTime
'DisplayName' = [System.TimezoneInfo]::Local | Select-Object -ExpandProperty DisplayName
}
$tmObj = New-Object psobject -Property $tmProps
$response.Send(($tmObj | ConvertTo-Json))
}
} -Force
Start-Polaris -Port 8082
#Keep Polaris running
while($true) {
Start-Sleep -Milliseconds 10
}
Configure your web-service to run as a service
Download NSSM and store the nssm.exe in C:\WebSrv . Run the following PowerShell line to convert Publish-ADData.ps1 into a service. – Use ISE or VSCode.